Wednesday, October 19, 2011

Decisions...Decisions

Yet another blog post that mentions my hero Thrifty Decor Chick. Seriously, this gal is my hero. Ever since I saw her post on her staircase I was all like "hey, I could TOTALLY do that".

Here is my vision:
From Thrifty Decor Chick's blog, her staircase
Here is my reality:
My carpet is just gross
Anyhow, the railing is worn from 20 years of wear and tear (and one suicidal dog but that is another story) and it is in need of some desperate TLC.  The problem is the wooden boards underneath my banisters are HIGHER than the wood underneath the carpet.  Therefore I would not have that nice brown stained uniform look all the way across.  There would be this "drop off".  Therefore I axed the idea of actually having the wooden stairs of my dreams and decided I'd just do the railing and leave the stairs carpeted.  Also because of having little ones, the carpeted stairs were a better plan.
See, the carpet is "level" with the wood on the side (those are my dogs marks there you see)
But if you know me, that's just not good enough.  Once I have a vision in my head, I need to find a way to complete it.  So I started doing some research.  I ran across one blog where the girls stairs were the biggest mess underneath.  Her trim on the side was not level with her treads either and she made it work.  I thought that maybe I could just keep ALL the trim-work white, and add molding to the inside next to the stairs, then do the treads only dark (either painted or stained depending on what type of wood I'm working with.)

See white trim higher than black stairs (mine would be brown)
The carpet NEEDS to go, but that just isn't in the budget right now.  I COULD do the rails and give the carpets a GOOD cleaning, but to do the stairs properly the carpet REALLY needs to be removed to make sure all the trim-work gets covered properly in the paint/stain.

My crazy thought is lets just rip up the carpet and I'll do it and make it look decent.  If we hate it, well we re-carpet it later down the road.

My poor husband.  I don't know HOW he puts up with me.

So, I started pulling back the carpet to see what I was dealing with. 

My wooden stairs do not nearly look like the mess she had.  In fact, they looked pretty decent to me.
This is not my BEST visual.  Please don't mind my UGLY tile.  I can't do anything about that now.
My husband is like 190% sure that we have builders pine underneath there (and I'm pretty sure he is right because he usually right like 99.9 percent of the time - he is a REALLY smart man), which pine doesn't stain the greatest.  It's not the best wood to be working with.  Still, crazy stubborn me thinks I can somehow pull a rabbit out of my hat and make it work.

I want to get this done, but I want to do it right.  But I want to get this done, like NOW.  The war rages inside of me, and in the meantime I can't think of anything else but THIS PROJECT.  Can you say OCD?  It's maddening I tell you, just maddening!

Tuesday, October 11, 2011

Painting My Cabinets

I never really intended for this to turn into a decorating blog, this is just what I've been up to lately. Creating makes me happy. I've felt SO alive and fulfilled these past few weeks doing these projects I can't even explain it.

Anyhow, I had planned for a LONG time to paint my built in cabinets around my fireplace in my den white, but every time I thought about doing it I just lost motivation. After I finished the bathroom I decided since I had just conquered those cabinets that I would tackle the ones in the den. After all, I'm not staining them.

Easy peasy.

Um. Did I mention my husband and oldest kids were out of town that weekend I decided to do it?

Did I mention that I had my four year old and two year old alone in the house with me?

Yeah, I wasn't thinking clearly. Obviously I'm pretty delusional about the amount of work that this was going to take.

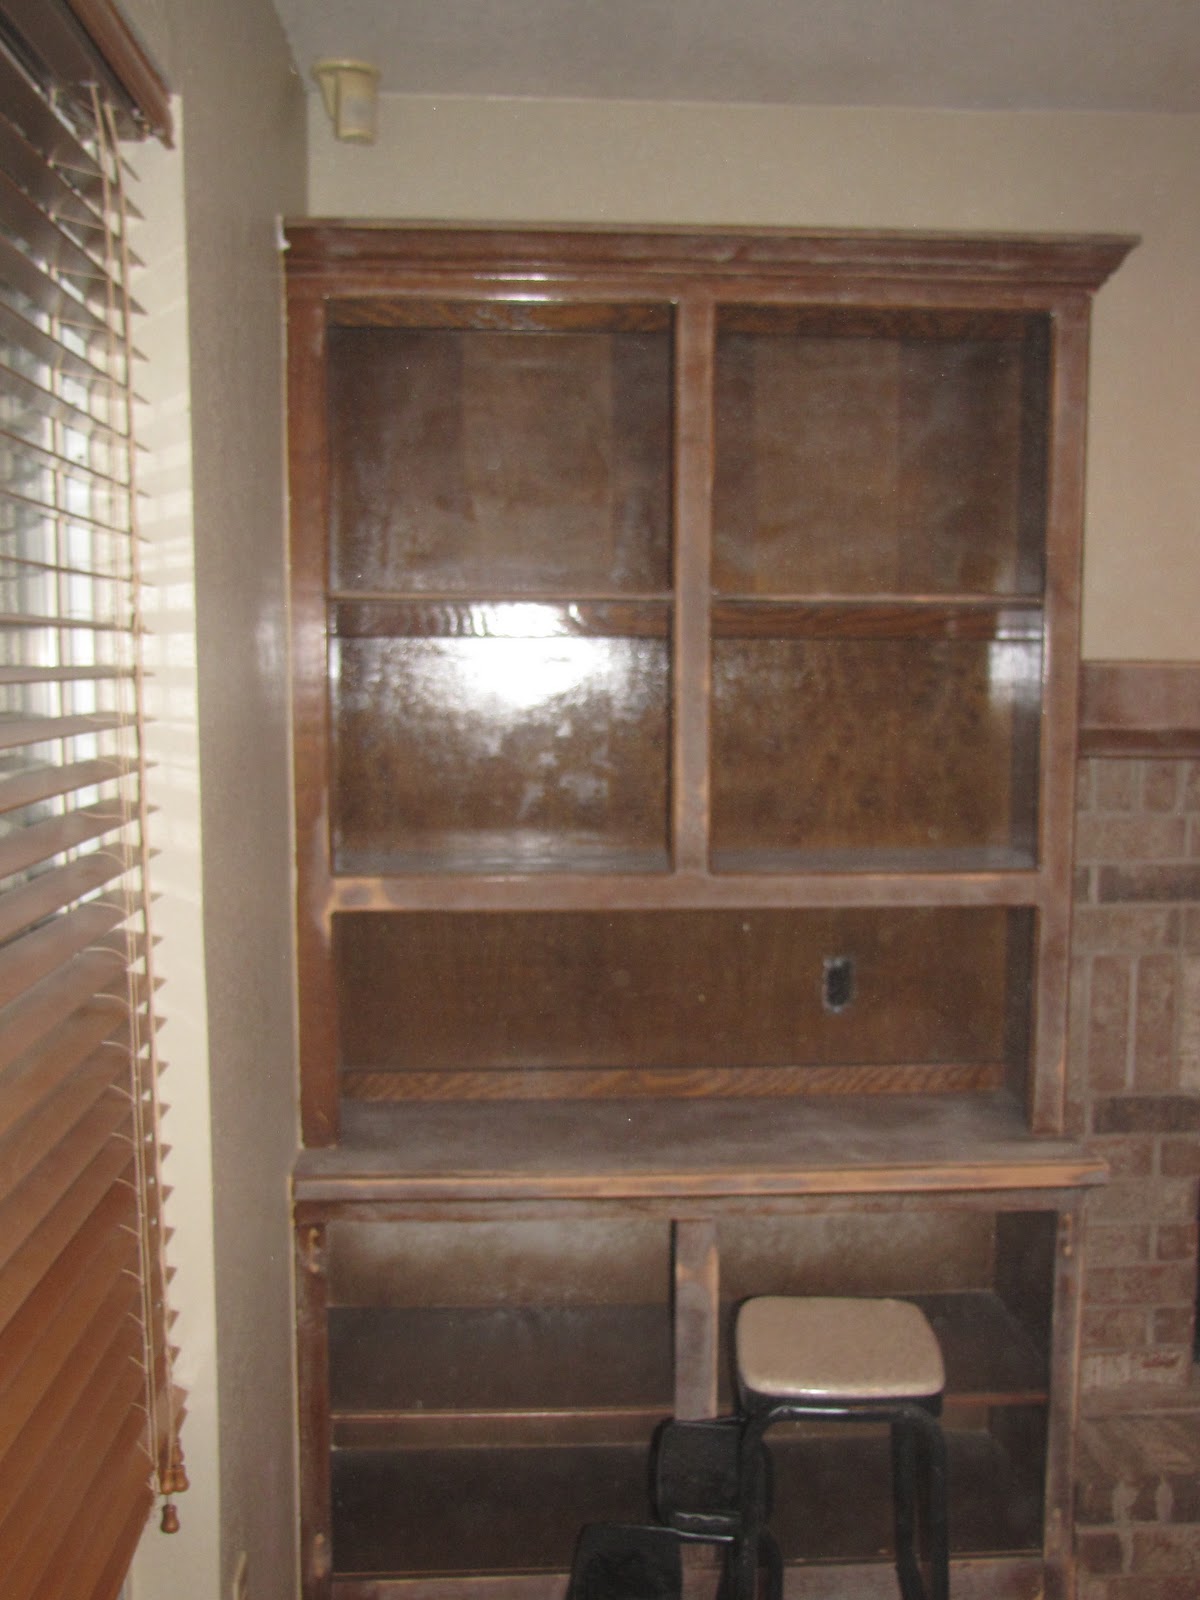
Here is where I started. The bookcases were a mess. Not only were they ugly, they were COVERED in polyurethane and they were cluttered.
My messy bookcases filled with UGLY paperbacks.

My mantel

The whole room.  The fan has GOT to go, but that's another project for another day.
My vision for the room is to get rid of the overstuffed furniture, put a desk on the right wall, remove the DVD cases, add two wing-back chairs (currently in need of reupholstering- but I'm too freaked to start that project) under the windows.  But alas, this was JUST getting the built ins done.

So I moved all the books, games and everything out of the cabinets.  I moved the sofa, and covered it a bit because I knew some dust would kick up.  My plan was to give enough "tooth" to scuff up the poly and let the primer do the rest.  I should have just sanded by hand everything, but I decided to grab the power sander.

I was delusional on just HOW MUCH dust this was going to kick up.  I quickly grew weary of sanding.  I was NOT as diligent as I should have been about the sanding process.  Yes, this would haunt me later.
You can almost still see the dust in the air. 
See that shiny poly on the back cabinet.  Yeah, I didn't.  Tsk.  Tsk. Bad Julie.
My goal was to prime that night, but after all the sanding I was pretty worn out and decided to wait till the morning to prime it.  I started reading some forums about what was the best primer, and come to find out with stain and poly since it is oil based you need to use an oil based primer.

I went to the garage to check my primer.  Latex.  Drats.

I loaded up my two little ones and went to Home Depot.  My 4 year old was running a slight fever, so I parked near the carts, and put both girls in the cart, and ran in.  It was my fastest trip in and out of Home Depot ever!  I got my primer and came home and started priming.

I've never used oil based paints or primers before, and oh GAWD it's the worst smelling stuff ever.  I mean it's bad people.  I figured I'd do a quick coat of primer and be done.  It took me THREE HOURS to prime these things because of all the nooks and crannies that I didn't sand.  The primer just was wiping off the corners of the cabinets and wouldn't stick.  Finally I had this foam brush and I was dabbing it into the corners and that seemed to work at last.
My mantel, primed.

My cabinet primed.  See those corners.  Arrgh.  They were the death of me I tell you.
And no, I did NOT paint the inside of the cabinets.  I had originally planned to but gave up on that pretty quickly.  I was regretting this project, my 4 year old wasn't feeling well, but I was too far into this to not finish.

Anyhoo, the next day I woke up after a horrible night with my four year old and decided I needed to take her to urgent care.  Turned out she had strep again.  I got her her medicine, brought her home and got the girls down for a nap and I started my painting.  The first coat took forever, but the second and third went much faster.

I let the paint cure for a few days before I started putting things back on the shelf, in the meantime I did the doors of the cabinets outside during the girls nap time and the rest of the project was really relaxed and I had a lot of fun.  I'd take a few hours a day and put things back on the shelf slowly, getting them all to look good.  My biggest problem was the paperbacks.  I found a few small baskets that held SOME but I had a TON left.  I had no place to put them and I didn't want them back on the shelf.  I was at Michaels the other day and ran across this gem for only $6:
Its a decorative box!  Held a TON of paperbacks and looks pretty on the shelf!
I still had a TON of paperbacks left even after purging a lot of them, so I got this at Ross for $12
It held ALL the rest of the paperbacks and it was pretty!  YAY!
 So, painting cabinets was NOT easy.  Staining cabinets is NOT easy.  These projects are NOT for the faint of heart, but I'm pleased as can be with how it turned out.  Here is the FULL reveal:

I can't BELIEVE how much brighter the room is.  I LOVE LOVE LOVE it.
No more cluttered books.  I streamlined.
Seriously a MILLION times better.
My mantel with my bird painting.

Monday, October 10, 2011

Put a Bird On It

I've had this idea in my head for a while to create some art that looked like THIS. It was another idea from Pinterest. The caption said "Elmers glue then paint over it." Genius I thought, pure genius.

So, I grabbed my canvas (which I had painted a long time ago and never finished), came up with a sketch of what I wanted, that included a sweet little bird. As I was drawing it I kept chuckling about the "Put a Bird on It," from the show Portlandia.


Anyhow, of course I ran into some issues. In doing this project I didn't actually look into the blog of the lady that did it. I took my HUGE canvas and just went all glue crazy on it. I could tell immediately that it didn't look as "puffy" as the photo from Pinterest, so I started to wonder what was going on.


So, I went onto the computer and went into the actual blog of the gal that created it. Come to find out it was NOT Elmers glue. She used puffy paint in a very SPECIFIC way to make this piece of art.

So, I had a couple options, go with what I had or try something new. I decided to go with it, paint on top of it and see where I was. If I still wanted more texture I could add the puffy paint afterward. After I added the white it was just TOO much white, it would have been fine for a small canvas, but this was just TOO much. Even with more texture it was going to overwhelm the bathroom where I had it and it needed something else to it. SO, I started painting some grey on it to see where I ended up.
It's getting somewhere now...
This is the finished painting, no place for it yet though....
I ended up liking the way the different shades of grey looked on the white canvas and left it as is. For fun I hung it over the fireplace in my den while I was painting the cabinets (to keep it out of reach of small hands) where my Monet painting used to be and it actually looked REALLY great there, so I just decided that it would stay!
My mantel (now painted white with new decor)
 Anyhow it was a DIY turned disaster that actually ended up being something different than I imagined, but it totally worked itself out, and I think its fun, even though I did get a little cheesy and "put a bird on it".  I've gone back and forth about adding color to the flowers, but I like it simple as is, the splash of color with the scrapbook paper on canvas is all I really want for now, so I think for now I'm just going to keep it that way.

Sunday, October 9, 2011

Bathroom Reveal

So, I just glued together my DIY mason jar soap dispenser, and decided to call the bathroom "done" enough to post photos.

We still need to nail down the baseboards and I have some other art I'm working on for the wall, but I was ready to wrap up this portion of my blog on my bathroom.

I had a LOT of fun with this project, and some frustration as well, but I'm extremely pleased with how it turned out.

So (drumroll) here it is:

Before:  Yellow walls, dingy cabinets, creme switches, brown trim.


After!  I am SO pleased with my dark cabinets, neutral walls and white trim!


Painting behind the toilet was NOT fun.
I went back to home depot and had them darken the color.  The first time I brought it home it was too "purple".  It's still a slight bit too pinky for my taste, but since my accent towels are purple, it actually works pretty well.  I also painted all the trim white in the room and I will eventually switch it out for a paneled white door when I get the funds.  Baseboards are all white now and I'm LOVING the contrast of the colors.  The dark trim was just SO not me.

I used my old flowers but made a new trough to put them in on the back of the toilet.  An idea I got here from my hero Thrifty Decor Chick.

I love how it turned out and it was super easy to make.  Just used scrap wood I had in the garage, wood glue and some nails and stain and voila.
Isn't it pretty?  I LOVE LOVE LOVE it.

I'm so into this rustic meets modern look.  Farmhouse meets modern decor.  LOVE it.  Another Pinterest find was the mason jar soap dispenser.  I decided to make one too, and I love how it looks in there.  I just followed the easy instructions.  The hardest part was getting the pump to stick on.  Hot glue did NOT work, and I had no plumbers adhesive, so I used good old superglue and it worked just fine.
My mason jar soap dispenser.
The vase I had in the attic for like...um, forever and I forgot about it.  Added some branches and voila!

I had a lot of fun on this project, but I'm glad it's over!  Seriously though the photos do not do justice to HOW MUCH better it looks, really.  Now I'm working on my den cabinets.  They are painted and I'm working on adding the decor to the shelves, that blog is coming soon!
Related Posts Plugin for WordPress, Blogger...