The first thing my husband did was go out and find a large branch that was about the right size and shape of a broom. Silly me forgot to take a photo of the branch, but that would have been nice, wouldn't it? (I'm still getting used to doing these DIY tutorials so please forgive me).
Sorry.
Anyhow my husband started stripping away with his knife to get all the bark off of the tree branch and get it to some sort of shape. Once he did that he sanded it like CRAZY and got it silk smooth and to the right shape.
We were not trying to go for a prop replica. Our son is only TEN and he will probably wear this thing out playing with it, we just wanted something similar for him to goof around with! I found GREAT tutorial online here at Instructables, but it was WAY after we had all ready been building ours. Anyhow, it's a great post so I recommend you check it out!
We stained it first with a dark walnut stain, then went over it with some Java gel stain.
I then went to Hobby Lobby and found some Prairie Grass for $9.99 (minus 40% off coupon) that I thought would work for the bristles of the broom.
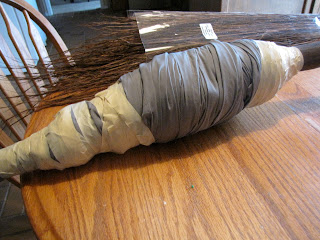
I grabbed an old towel and curtain that I was no longer in need of to wrap it as padding and give it the shape underneath that it needed. You could also use foam or styrofoam. I just went for what I had on hand.
After I got the general shape of it my husband and I added the prairie grass to it and taped it. There MAY or MAY not have been a slight argument about how to get it to stay on there properly. I really need to stop questioning his judgment. The man is always right. (Please don't tell him I said that though.)
We taped it on there as a temporary hold then went and got pipe clamps to clamp the top and the bottom and screw it on tight. My husband then COATED the thing in spray adhesive to get it to stick, cut off the top and bottom of the bristles to make it even, then wrapped it in twine. If I had to do anything over again, it would be that I would have taken the time like the guy on Instructables did to painstakingly put on the bristles, but we were running out of time nearing Christmas eve, so we went for a quick fix. Also, this is a kids TOY and I'm certain one day we will be replacing the bristles on it. When we do that I may change some things up.
Next I went and added "Nimbus 2000" in gold paint on the handle.
Then last added a coat of polyurethane to the handle and it was complete! Someday we may go back and add the footrests, but for now, he is perfectly happy with it how it is, and the total project cost us less than $10.00 to complete for a pretty awesome gift!
I think he was pretty thrilled with his gift!


This is exactly the broom tutorial I've been looking for! Thank you so much!
ReplyDeleteYou are welcome. Glad it could help!
Deletethx this is awesome
ReplyDeleteis it possible to purchase this from you?
ReplyDeleteIt really a very useful information of homemade Harry Potter Broom. Thanks for sharing it. PET Monofilament.
ReplyDeleteNice...
ReplyDeleteWell its 11 years later and the newest batch of Harry Potter fans are reaping the rewards of your hard work! Does your 21 yr old son still have his Nimbus 2000? Lol! Thanks so much!
ReplyDelete😂😂😂😂😂😂
ReplyDeleteLovely post, thanks for posting
ReplyDelete