Showing posts with label renovatiion. Show all posts

Monday, November 28, 2011

The Dining Room

I've known for a while that I wanted to re-paint my dining room, but it was pretty low on the priority list, but I decided to move it up because of company coming in for Thanksgiving.

I've gone back and forth the past few weeks, do I do it or not. I wasn't sure I wanted to undertake ANOTHER project right before the Holidays, but every time I walked into the room and saw my girls "artwork" on the walls and the scuffed up oak trim I would just cringe. It just looked DIRTY.

Finally I talked with my husband, who was totally in for it and I went for it. (his side will say that I MAY have caught him over IM while he was in the middle of a server crash at work, and used that to my advantage).

It has taken me over a week. Scuffing up the oak trim (to give it tooth), oil primer (because of the oil poly on the current trim), then paint. When we first moved into this house I LOVED all the trim work and crown molding it had, I just didn't care for the color of the stain. It was this orangey oak. If it was darker it would have been fine, but I just didn't like the color. I prefer white trim. I love the contrast of white trim on a colored wall, it just looks bright and clean and crisp.  Also with kids CONSTANTLY scuffing it up, I can just keep a can of trim paint on hand and touch up when needed.

After we moved in, I looked at my husband and said "I want to switch all the trim in the house to white."

He looked at me like I was nuts. He said kindly "That is a LOT of work."

I said "It won't be THAT bad."

Famous last words of a fool.

I have like THOUSANDS of feet of dark trim in this house. It's going to take me forever.

It's totally worth it in the long run though.  I LOVE the white trim, even though my arms are STILL aching from working on that crown molding.

Anyhow, the dining room is done, and hopefully after the Holidays we will move to the living room, do the built in/mantel on the fireplace and get that room next!

Here are the before and afters! Enjoy!

This was our OLD dining table, about three years ago (its the best before shot I have).

Here is our new table, but we hadn't got the chairs yet.  Still a pretty old photo.

Here is a more current photo of the room, after the furniture is moved out.

The before photos really do NOT show how bad the walls and trim really looked.  The walls were drawn on by my kiddos, and I tried magic eraser, but that left spots on the wall, it was pretty bad.  Here is the after with all my Thanksgiving decor!

This is at night, before I added my chairs back to the room.  We decided to leave the blinds off the windows, it looks so much better that way!

Daytime photo

My thanksgiving decor on the table!  Repainted the mirror white.  I'm glad I finally found a spot for the white shelves I had!

My homemade napkin rings (made from toilet paper rolls) and placards

My 90% off decor from Hobby Lobby and dollar store candle holders!  Waiting till the last minute pays off.

I'm really pleased with how it turned out.  I was worried I wouldn't get it finished and I was painting up until Tuesday before Thanksgiving!  I'm glad we decided to go ahead and do it, and I'm glad I went with the bold color!  I love it, love it, love it!

*UPDATE*

I love it so much I'm submitting it to a few blogs to try and get featured, right now I have about UM, 5 readers that actually read my blog (I kid, I kid....) but seriously I'd love to get some traffic to my site.

I'm hoping to get featured in Beneath My Heart "best DIY Projects of November".  I LOVE this gal.  Every morning when I open up my Google reader I'm anxious to see what she has posted, and you guys have GOT to read her whole kitchen renovation story!  It's great!  I can SO relate!

*UPDATE* 04/16/2012
 Linking up with TDC:

Thrifty Decor Chick

Wednesday, October 19, 2011

Decisions...Decisions

Yet another blog post that mentions my hero Thrifty Decor Chick. Seriously, this gal is my hero. Ever since I saw her post on her staircase I was all like "hey, I could TOTALLY do that".

Here is my vision:
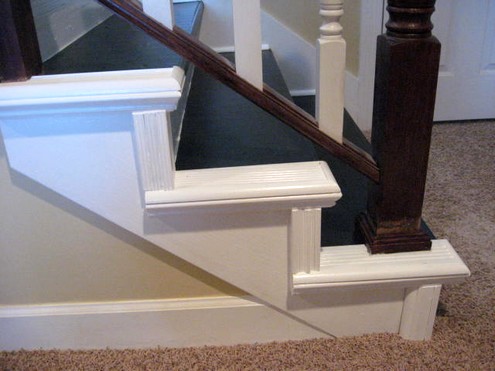
From Thrifty Decor Chick's blog, her staircase
Here is my reality:
My carpet is just gross
Anyhow, the railing is worn from 20 years of wear and tear (and one suicidal dog but that is another story) and it is in need of some desperate TLC.  The problem is the wooden boards underneath my banisters are HIGHER than the wood underneath the carpet.  Therefore I would not have that nice brown stained uniform look all the way across.  There would be this "drop off".  Therefore I axed the idea of actually having the wooden stairs of my dreams and decided I'd just do the railing and leave the stairs carpeted.  Also because of having little ones, the carpeted stairs were a better plan.
See, the carpet is "level" with the wood on the side (those are my dogs marks there you see)
But if you know me, that's just not good enough.  Once I have a vision in my head, I need to find a way to complete it.  So I started doing some research.  I ran across one blog where the girls stairs were the biggest mess underneath.  Her trim on the side was not level with her treads either and she made it work.  I thought that maybe I could just keep ALL the trim-work white, and add molding to the inside next to the stairs, then do the treads only dark (either painted or stained depending on what type of wood I'm working with.)

See white trim higher than black stairs (mine would be brown)
The carpet NEEDS to go, but that just isn't in the budget right now.  I COULD do the rails and give the carpets a GOOD cleaning, but to do the stairs properly the carpet REALLY needs to be removed to make sure all the trim-work gets covered properly in the paint/stain.

My crazy thought is lets just rip up the carpet and I'll do it and make it look decent.  If we hate it, well we re-carpet it later down the road.

My poor husband.  I don't know HOW he puts up with me.

So, I started pulling back the carpet to see what I was dealing with. 

My wooden stairs do not nearly look like the mess she had.  In fact, they looked pretty decent to me.
This is not my BEST visual.  Please don't mind my UGLY tile.  I can't do anything about that now.
My husband is like 190% sure that we have builders pine underneath there (and I'm pretty sure he is right because he usually right like 99.9 percent of the time - he is a REALLY smart man), which pine doesn't stain the greatest.  It's not the best wood to be working with.  Still, crazy stubborn me thinks I can somehow pull a rabbit out of my hat and make it work.

I want to get this done, but I want to do it right.  But I want to get this done, like NOW.  The war rages inside of me, and in the meantime I can't think of anything else but THIS PROJECT.  Can you say OCD?  It's maddening I tell you, just maddening!

Tuesday, October 11, 2011

Painting My Cabinets

I never really intended for this to turn into a decorating blog, this is just what I've been up to lately. Creating makes me happy. I've felt SO alive and fulfilled these past few weeks doing these projects I can't even explain it.

Anyhow, I had planned for a LONG time to paint my built in cabinets around my fireplace in my den white, but every time I thought about doing it I just lost motivation. After I finished the bathroom I decided since I had just conquered those cabinets that I would tackle the ones in the den. After all, I'm not staining them.

Easy peasy.

Um. Did I mention my husband and oldest kids were out of town that weekend I decided to do it?

Did I mention that I had my four year old and two year old alone in the house with me?

Yeah, I wasn't thinking clearly. Obviously I'm pretty delusional about the amount of work that this was going to take.

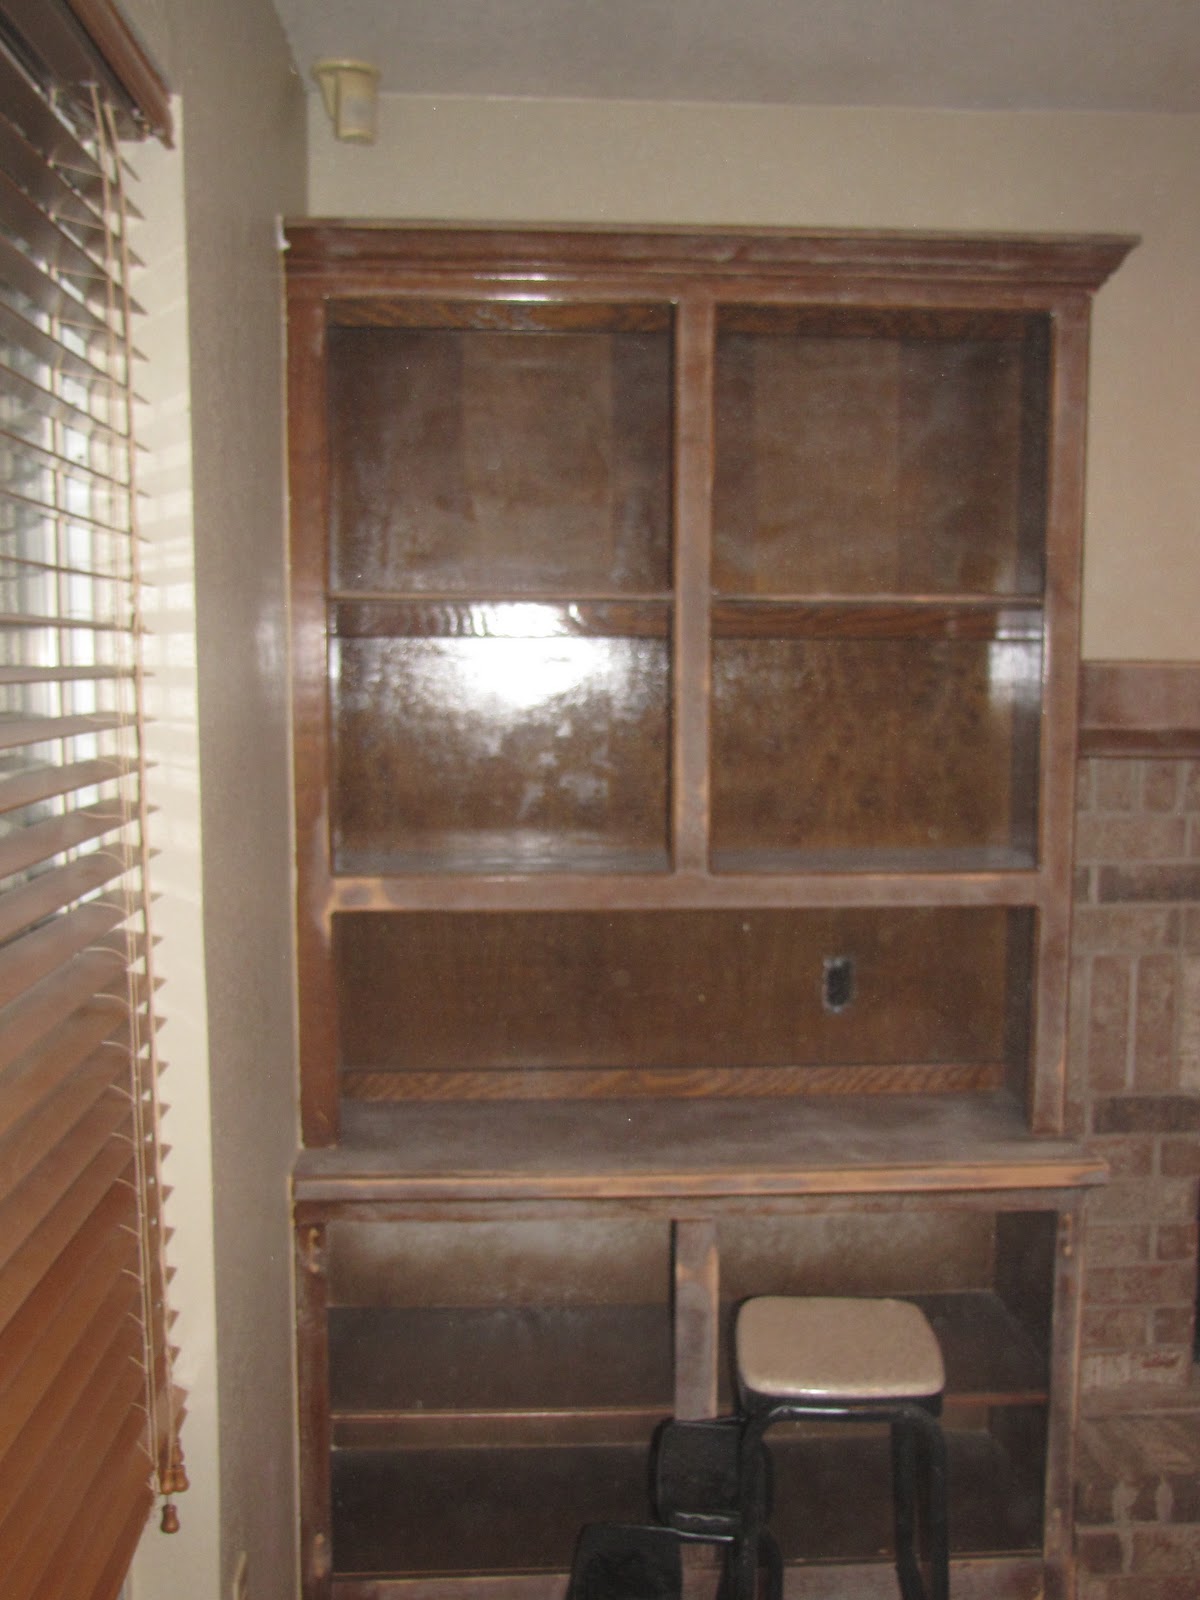
Here is where I started. The bookcases were a mess. Not only were they ugly, they were COVERED in polyurethane and they were cluttered.
My messy bookcases filled with UGLY paperbacks.

My mantel

The whole room.  The fan has GOT to go, but that's another project for another day.
My vision for the room is to get rid of the overstuffed furniture, put a desk on the right wall, remove the DVD cases, add two wing-back chairs (currently in need of reupholstering- but I'm too freaked to start that project) under the windows.  But alas, this was JUST getting the built ins done.

So I moved all the books, games and everything out of the cabinets.  I moved the sofa, and covered it a bit because I knew some dust would kick up.  My plan was to give enough "tooth" to scuff up the poly and let the primer do the rest.  I should have just sanded by hand everything, but I decided to grab the power sander.

I was delusional on just HOW MUCH dust this was going to kick up.  I quickly grew weary of sanding.  I was NOT as diligent as I should have been about the sanding process.  Yes, this would haunt me later.
You can almost still see the dust in the air. 
See that shiny poly on the back cabinet.  Yeah, I didn't.  Tsk.  Tsk. Bad Julie.
My goal was to prime that night, but after all the sanding I was pretty worn out and decided to wait till the morning to prime it.  I started reading some forums about what was the best primer, and come to find out with stain and poly since it is oil based you need to use an oil based primer.

I went to the garage to check my primer.  Latex.  Drats.

I loaded up my two little ones and went to Home Depot.  My 4 year old was running a slight fever, so I parked near the carts, and put both girls in the cart, and ran in.  It was my fastest trip in and out of Home Depot ever!  I got my primer and came home and started priming.

I've never used oil based paints or primers before, and oh GAWD it's the worst smelling stuff ever.  I mean it's bad people.  I figured I'd do a quick coat of primer and be done.  It took me THREE HOURS to prime these things because of all the nooks and crannies that I didn't sand.  The primer just was wiping off the corners of the cabinets and wouldn't stick.  Finally I had this foam brush and I was dabbing it into the corners and that seemed to work at last.
My mantel, primed.

My cabinet primed.  See those corners.  Arrgh.  They were the death of me I tell you.
And no, I did NOT paint the inside of the cabinets.  I had originally planned to but gave up on that pretty quickly.  I was regretting this project, my 4 year old wasn't feeling well, but I was too far into this to not finish.

Anyhoo, the next day I woke up after a horrible night with my four year old and decided I needed to take her to urgent care.  Turned out she had strep again.  I got her her medicine, brought her home and got the girls down for a nap and I started my painting.  The first coat took forever, but the second and third went much faster.

I let the paint cure for a few days before I started putting things back on the shelf, in the meantime I did the doors of the cabinets outside during the girls nap time and the rest of the project was really relaxed and I had a lot of fun.  I'd take a few hours a day and put things back on the shelf slowly, getting them all to look good.  My biggest problem was the paperbacks.  I found a few small baskets that held SOME but I had a TON left.  I had no place to put them and I didn't want them back on the shelf.  I was at Michaels the other day and ran across this gem for only $6:
Its a decorative box!  Held a TON of paperbacks and looks pretty on the shelf!
I still had a TON of paperbacks left even after purging a lot of them, so I got this at Ross for $12
It held ALL the rest of the paperbacks and it was pretty!  YAY!
 So, painting cabinets was NOT easy.  Staining cabinets is NOT easy.  These projects are NOT for the faint of heart, but I'm pleased as can be with how it turned out.  Here is the FULL reveal:

I can't BELIEVE how much brighter the room is.  I LOVE LOVE LOVE it.
No more cluttered books.  I streamlined.
Seriously a MILLION times better.
My mantel with my bird painting.

Sunday, October 9, 2011

Bathroom Reveal

So, I just glued together my DIY mason jar soap dispenser, and decided to call the bathroom "done" enough to post photos.

We still need to nail down the baseboards and I have some other art I'm working on for the wall, but I was ready to wrap up this portion of my blog on my bathroom.

I had a LOT of fun with this project, and some frustration as well, but I'm extremely pleased with how it turned out.

So (drumroll) here it is:

Before:  Yellow walls, dingy cabinets, creme switches, brown trim.


After!  I am SO pleased with my dark cabinets, neutral walls and white trim!


Painting behind the toilet was NOT fun.
I went back to home depot and had them darken the color.  The first time I brought it home it was too "purple".  It's still a slight bit too pinky for my taste, but since my accent towels are purple, it actually works pretty well.  I also painted all the trim white in the room and I will eventually switch it out for a paneled white door when I get the funds.  Baseboards are all white now and I'm LOVING the contrast of the colors.  The dark trim was just SO not me.

I used my old flowers but made a new trough to put them in on the back of the toilet.  An idea I got here from my hero Thrifty Decor Chick.

I love how it turned out and it was super easy to make.  Just used scrap wood I had in the garage, wood glue and some nails and stain and voila.
Isn't it pretty?  I LOVE LOVE LOVE it.

I'm so into this rustic meets modern look.  Farmhouse meets modern decor.  LOVE it.  Another Pinterest find was the mason jar soap dispenser.  I decided to make one too, and I love how it looks in there.  I just followed the easy instructions.  The hardest part was getting the pump to stick on.  Hot glue did NOT work, and I had no plumbers adhesive, so I used good old superglue and it worked just fine.
My mason jar soap dispenser.
The vase I had in the attic for like...um, forever and I forgot about it.  Added some branches and voila!

I had a lot of fun on this project, but I'm glad it's over!  Seriously though the photos do not do justice to HOW MUCH better it looks, really.  Now I'm working on my den cabinets.  They are painted and I'm working on adding the decor to the shelves, that blog is coming soon!

Friday, September 30, 2011

Playing With Electricity

Kids, don't try this at home ;)

Ok, seriously though, I've been doing this bathroom renovation and trying to do the majority of it myself. I realize my husband is a VERY handy man, but he is also really busy, so I didn't want to ask him to do everything on this project. I wanted to be able to say that I did most of it myself, not giving up at the first sign of frustration and caving and asking my husband to do it.

So, I did it. Sanded, stained, applied poly, primed, painted and now it was time to swap out my light switches, receptacles and light fixture. It was time to play with electricity.  I wanted to switch out my old creme colored receptacles and switches for new white ones.

I've read Thrifty Decor Chicks post about installing a dimmer switch, and by golly, if she can do it so can I. I was bound and determined to get this thing done.

I started by going to the breaker box. Of course, NOTHING was labeled properly. I finally found the switch that turned off my light in the bathroom and decided to go for it. You would think that the light and receptacle would be on the same breaker right? Wrong. NEVER assume that. Luckily I had the good sense enough to plug something into the recep even after the light went out to make DOUBLE sure that there was no juice going to the outlet. There was. I freaked a little and my heart skipped a beat.

I could just see myself fried to smithereens on the floor when my 12 year old came home.

So, I left the recep alone and decided to just proceed with the light. This actually worked in my favor because I was able to plug a lamp in to give me light while working.

I unscrewed the light switch and pulled it out from the wall. Scared to death to touch it. Doesn't help that my husband was posting photos on my Facebook wall like this:


Yep.  That's my man.  Anyhow, you basically have two options with the wire.  You can stick it in this TEENY hole in the back, or curl it around the sides.  Mine were stuck into the back, and as much as I pulled, and pulled, I couldn't get the old wires out.  Even after hitting the "release" button it still wouldn't work for me.  Finally I just snipped the wires with wire clippers and then trimmed them back.  I ended up putting the new one on and just curling it around the screws.  With the light switch both wires were the same color so it didn't matter which one went on which side.

It took me WAY longer than expected.  I sweat.  A lot.  Yes, I was freaked out.  No, it wasn't as easy as I thought it would be.

I was done for the day on that one.  The next day I decided to take a stab at the receptacle.  Took me a while but I finally found the breaker for that one as well.  Flipped the breaker off and just went at it.  This one took me about twenty minutes because, after all I'm a professional now at this stuff.
Here is the "Before" shot

After I got the recep off here is what you are left with, ground wire (copper), white wire and black wire

This one is a bit trickier just because you have to make sure the white and black go to their specified side, but still, it wasn't difficult.
Again, I twisted my wire instead of going through the holes.  Much easier in my opinion
Oh also, FYI the wire trimmers have this nifty little hole on it that makes twisting the wire a snap.  Wish I would have figured that out yesterday.  Oh well, live and learn (and watch YouTube).
All done! SO much prettier!
Since I got that recep done in such a snap I decided to tackle the light fixture.  After all, Julie is now a master electrician right?  This light fixture should obviously be a snap.  It wasn't.  It took over an hour of grunting, cussing, sweating and crying to get the thing on.  My first problem came when I couldn't figure out how to get the mounting bracket into the junction box, once I figured that out, the wires would not go into the wire nut properly and kept falling out.  Oh, and NOWHERE in the directions does it tell you that you need at least four hands to get this done properly.  There were times I was using my toes to pick up a screwdriver off the sink while my hands held the light in place and I'm standing precariously on a step-stool on one foot.

But I did it people.  It looks SO MUCH BETTER.
Before.  I should have donated it, but I think I did someone a favor by tossing the ugly thing.

After.  My pretty new light fixture. (yes, it's an awful photo)
There are several things I learned this week.  First off a whole new vocabulary with words like mounting bracket, junction box, breaker, wire nut, wire release, ground, and so many more.  Second, guy jobs suck.  Seriously.  They are not really that fun.  I'm ready to go back to picking out decorative towels and arranging flowers, because this crap is just grunt work.

However this project has been my Everest, my lobster from Julie and Julia, my obstacle that I had to get over to continue, and I'm pretty darn proud of myself for completing it!

Now its time to go hang some photos....

Friday, September 16, 2011

The Half Bath Redo

A while ago I got the brilliant idea to stain my half bath vanity cabinets a darker color, and to paint my den cabinets white. Then I could decide which I liked better for my kitchen, dark or white.

My half bath was actually one of the best looking rooms in the house, the cabinets had the least wear and tear and the paint job was much fresher than any of the other rooms. Seriously there are probably about a thousand projects that should of taken higher priority than this. However since it was the cheapest project and a test on how I will handle the rest of the house, it was actually the perfect place to begin.

I've had this idea in my head for a while and finally I came home last week and my wonderful husband had taken everything out of the bathroom and started sanding the cabinets for me. We taped a tarp over the door and brought in his shop vac and reversed the air flow to eliminate a lot of the dust from getting in my house. It worked pretty well. The dust stayed mostly on us and in the bathroom!


Once we got down to nearly raw wood (we weren't extremely particular because we are going darker), we cleaned up and vacuumed all the dust off the cabinets.


Oh, and I'm SOOO putting shelving paper on those shelves.  They are disgusting, I know.

The next day we began staining.

If you know me well, you know I have trouble making a decision. I sat in Home Depot Sunday morning with a can of Ebony and a can of Jacobean stain for about 45 minutes while surfing the net on my iPhone at what these colors actually looked like completed. I finally went with the Jacobean and came home, because the people at Home Depot were starting to think I was weird.

So we stained.

We stained more. And more....finally four coats in they just were NOT getting any darker. I wasn't happy. It was not my vision, but I sighed and figured I'd just live with it.  They did look a TON better than the old color, but still not my vision.


My wonderful mother in law (who knows a LOT about staining) told me not do do anything else until she came over with some of her stuff. I wasn't certain we could fix the cabinets, because they are pretty cheap pine plywood (seriously the edges of these cabinets are NUTS people...they just soak up the color like crazy).

Anyhow, she came over with a couple other options for color. She took one look at my cabinets and said "those aren't very dark."  She confirmed EXACTLY what I was feeling.  (It's so good to have her opinion, she is such a great lady).  She had a gel stain (Java) that she got from Woodcraft and she said I should put that on top. I tried it on the back of the cabinet and I LOVED it. It just gave it that richness that the Jacobean was lacking. So, I started staining....AGAIN. Gave all the cabinets backs, fronts and built in's in the bathroom another coat of the gel stain and it turned out just about perfect.


I may need ONE more coat on the cabinet fronts. For some reason the base is taking the color better than the cabinet doors, and I don't want it to be mis-matched. The flash doesn't help, but it really does look gorgeous.

I'm SO over staining and ready to move on to painting my bathroom, putting down new baseboards and getting the decorations back in there. I almost have my paint color picked out. That was a funny story in itself. Proves how brilliantly crazy that I am.

Thrifty Decor Chick
has the most gorgeous colored walls I've ever seen in her stairway, and that is the color I'm wanting to go with. She got the color at Porter Paints. So I found the place up in Edmond that sells the paint and went up there. The color is discontinued but they still had a swatch of it and said they could match it for $32 a gallon. Uh, yeah, I can't pay that it's WAAAAY out of my budget. Of course since it was discontinued they didn't have a swatch they could let me take. So I took the swatch around their store and found one similar to it that would work, grabbed that swatch and plan to try and color match it at Home Depot later this week.

I told you I'm nuts.

I think I've decided though that painting my kitchen will be a LOT easier than staining. I'm getting this vision for it. White cabinets with a black glaze in the cracks, dark granite or poured concrete counters...oil rubbed bronze pulls....dark espresso beams across the ceiling with some canned lighting. Farmhouse table with a bench in the dinette area, with dark hardwood floors. Are you seeing my vision?

Anyhow, stick with me, the full reveal will be coming soon!
Related Posts Plugin for WordPress, Blogger...