Showing posts with label art. Show all posts

Tuesday, October 11, 2011

Painting My Cabinets

I never really intended for this to turn into a decorating blog, this is just what I've been up to lately. Creating makes me happy. I've felt SO alive and fulfilled these past few weeks doing these projects I can't even explain it.

Anyhow, I had planned for a LONG time to paint my built in cabinets around my fireplace in my den white, but every time I thought about doing it I just lost motivation. After I finished the bathroom I decided since I had just conquered those cabinets that I would tackle the ones in the den. After all, I'm not staining them.

Easy peasy.

Um. Did I mention my husband and oldest kids were out of town that weekend I decided to do it?

Did I mention that I had my four year old and two year old alone in the house with me?

Yeah, I wasn't thinking clearly. Obviously I'm pretty delusional about the amount of work that this was going to take.

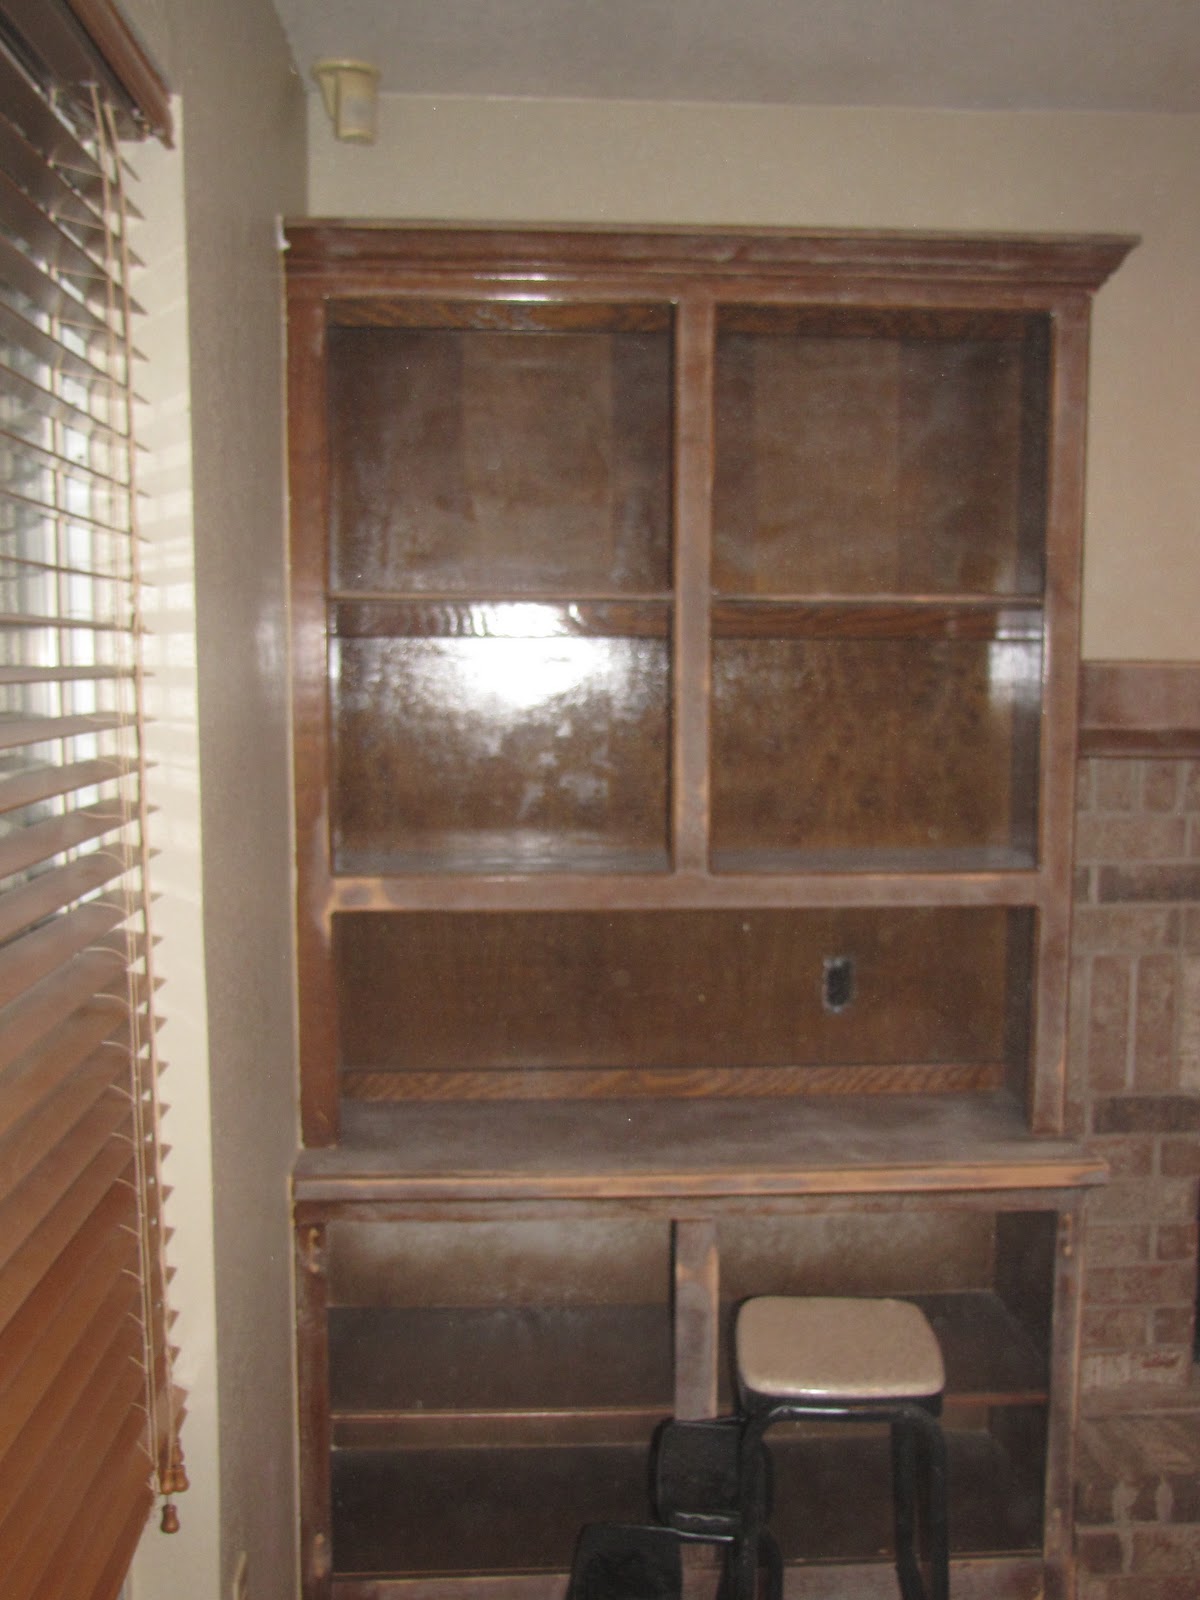
Here is where I started. The bookcases were a mess. Not only were they ugly, they were COVERED in polyurethane and they were cluttered.
My messy bookcases filled with UGLY paperbacks.

My mantel

The whole room.  The fan has GOT to go, but that's another project for another day.
My vision for the room is to get rid of the overstuffed furniture, put a desk on the right wall, remove the DVD cases, add two wing-back chairs (currently in need of reupholstering- but I'm too freaked to start that project) under the windows.  But alas, this was JUST getting the built ins done.

So I moved all the books, games and everything out of the cabinets.  I moved the sofa, and covered it a bit because I knew some dust would kick up.  My plan was to give enough "tooth" to scuff up the poly and let the primer do the rest.  I should have just sanded by hand everything, but I decided to grab the power sander.

I was delusional on just HOW MUCH dust this was going to kick up.  I quickly grew weary of sanding.  I was NOT as diligent as I should have been about the sanding process.  Yes, this would haunt me later.
You can almost still see the dust in the air. 
See that shiny poly on the back cabinet.  Yeah, I didn't.  Tsk.  Tsk. Bad Julie.
My goal was to prime that night, but after all the sanding I was pretty worn out and decided to wait till the morning to prime it.  I started reading some forums about what was the best primer, and come to find out with stain and poly since it is oil based you need to use an oil based primer.

I went to the garage to check my primer.  Latex.  Drats.

I loaded up my two little ones and went to Home Depot.  My 4 year old was running a slight fever, so I parked near the carts, and put both girls in the cart, and ran in.  It was my fastest trip in and out of Home Depot ever!  I got my primer and came home and started priming.

I've never used oil based paints or primers before, and oh GAWD it's the worst smelling stuff ever.  I mean it's bad people.  I figured I'd do a quick coat of primer and be done.  It took me THREE HOURS to prime these things because of all the nooks and crannies that I didn't sand.  The primer just was wiping off the corners of the cabinets and wouldn't stick.  Finally I had this foam brush and I was dabbing it into the corners and that seemed to work at last.
My mantel, primed.

My cabinet primed.  See those corners.  Arrgh.  They were the death of me I tell you.
And no, I did NOT paint the inside of the cabinets.  I had originally planned to but gave up on that pretty quickly.  I was regretting this project, my 4 year old wasn't feeling well, but I was too far into this to not finish.

Anyhoo, the next day I woke up after a horrible night with my four year old and decided I needed to take her to urgent care.  Turned out she had strep again.  I got her her medicine, brought her home and got the girls down for a nap and I started my painting.  The first coat took forever, but the second and third went much faster.

I let the paint cure for a few days before I started putting things back on the shelf, in the meantime I did the doors of the cabinets outside during the girls nap time and the rest of the project was really relaxed and I had a lot of fun.  I'd take a few hours a day and put things back on the shelf slowly, getting them all to look good.  My biggest problem was the paperbacks.  I found a few small baskets that held SOME but I had a TON left.  I had no place to put them and I didn't want them back on the shelf.  I was at Michaels the other day and ran across this gem for only $6:
Its a decorative box!  Held a TON of paperbacks and looks pretty on the shelf!
I still had a TON of paperbacks left even after purging a lot of them, so I got this at Ross for $12
It held ALL the rest of the paperbacks and it was pretty!  YAY!
 So, painting cabinets was NOT easy.  Staining cabinets is NOT easy.  These projects are NOT for the faint of heart, but I'm pleased as can be with how it turned out.  Here is the FULL reveal:

I can't BELIEVE how much brighter the room is.  I LOVE LOVE LOVE it.
No more cluttered books.  I streamlined.
Seriously a MILLION times better.
My mantel with my bird painting.

Monday, October 10, 2011

Put a Bird On It

I've had this idea in my head for a while to create some art that looked like THIS. It was another idea from Pinterest. The caption said "Elmers glue then paint over it." Genius I thought, pure genius.

So, I grabbed my canvas (which I had painted a long time ago and never finished), came up with a sketch of what I wanted, that included a sweet little bird. As I was drawing it I kept chuckling about the "Put a Bird on It," from the show Portlandia.


Anyhow, of course I ran into some issues. In doing this project I didn't actually look into the blog of the lady that did it. I took my HUGE canvas and just went all glue crazy on it. I could tell immediately that it didn't look as "puffy" as the photo from Pinterest, so I started to wonder what was going on.


So, I went onto the computer and went into the actual blog of the gal that created it. Come to find out it was NOT Elmers glue. She used puffy paint in a very SPECIFIC way to make this piece of art.

So, I had a couple options, go with what I had or try something new. I decided to go with it, paint on top of it and see where I was. If I still wanted more texture I could add the puffy paint afterward. After I added the white it was just TOO much white, it would have been fine for a small canvas, but this was just TOO much. Even with more texture it was going to overwhelm the bathroom where I had it and it needed something else to it. SO, I started painting some grey on it to see where I ended up.
It's getting somewhere now...
This is the finished painting, no place for it yet though....
I ended up liking the way the different shades of grey looked on the white canvas and left it as is. For fun I hung it over the fireplace in my den while I was painting the cabinets (to keep it out of reach of small hands) where my Monet painting used to be and it actually looked REALLY great there, so I just decided that it would stay!
My mantel (now painted white with new decor)
 Anyhow it was a DIY turned disaster that actually ended up being something different than I imagined, but it totally worked itself out, and I think its fun, even though I did get a little cheesy and "put a bird on it".  I've gone back and forth about adding color to the flowers, but I like it simple as is, the splash of color with the scrapbook paper on canvas is all I really want for now, so I think for now I'm just going to keep it that way.

Sunday, October 9, 2011

Bathroom Reveal

So, I just glued together my DIY mason jar soap dispenser, and decided to call the bathroom "done" enough to post photos.

We still need to nail down the baseboards and I have some other art I'm working on for the wall, but I was ready to wrap up this portion of my blog on my bathroom.

I had a LOT of fun with this project, and some frustration as well, but I'm extremely pleased with how it turned out.

So (drumroll) here it is:

Before:  Yellow walls, dingy cabinets, creme switches, brown trim.


After!  I am SO pleased with my dark cabinets, neutral walls and white trim!


Painting behind the toilet was NOT fun.
I went back to home depot and had them darken the color.  The first time I brought it home it was too "purple".  It's still a slight bit too pinky for my taste, but since my accent towels are purple, it actually works pretty well.  I also painted all the trim white in the room and I will eventually switch it out for a paneled white door when I get the funds.  Baseboards are all white now and I'm LOVING the contrast of the colors.  The dark trim was just SO not me.

I used my old flowers but made a new trough to put them in on the back of the toilet.  An idea I got here from my hero Thrifty Decor Chick.

I love how it turned out and it was super easy to make.  Just used scrap wood I had in the garage, wood glue and some nails and stain and voila.
Isn't it pretty?  I LOVE LOVE LOVE it.

I'm so into this rustic meets modern look.  Farmhouse meets modern decor.  LOVE it.  Another Pinterest find was the mason jar soap dispenser.  I decided to make one too, and I love how it looks in there.  I just followed the easy instructions.  The hardest part was getting the pump to stick on.  Hot glue did NOT work, and I had no plumbers adhesive, so I used good old superglue and it worked just fine.
My mason jar soap dispenser.
The vase I had in the attic for like...um, forever and I forgot about it.  Added some branches and voila!

I had a lot of fun on this project, but I'm glad it's over!  Seriously though the photos do not do justice to HOW MUCH better it looks, really.  Now I'm working on my den cabinets.  They are painted and I'm working on adding the decor to the shelves, that blog is coming soon!

Monday, October 11, 2010

The Decorating Bug

For two years now I've been in my home, and for two years I've had blank walls. The reason for this is two fold.

1. I consider myself to be a bit artsy and crafty, yet I don't have any works of art I feel worthy of putting up on my walls, but I refuse to just "buy" something made by someone else when I'm perfectly capable of making something.
2. It takes MONEY and TIME to make things. Both I always come up short on.

So, for two years my walls have remained empty and projects are left unfinished. SO, I'm dedicating this fall/winter to taking care of my walls and unfinished projects little by little. Thanks to Thrifty Decor Chick she has got me totally motivated with her savvy thrift store salvages and restorations.  I'm in awe of some of the stuff she comes up with.  Totally gorgeous and totally within budget.

So, I admit I kinda suck on decorating.  I just don't know how to arrange things properly on walls and what should go where.  I'm pretty awesome at copycatting things, so that's pretty much what I plan to do but add my own little flair to it.

So I started last week with my wine bottle project (which I totally stole from somewhere but can't find the link so I can't give them credit...so sorry).  Anyhow, I primed them, painted them a color to match my Asian tablecloths and then looked up the Chinese words online, crossing my fingers I didn't accidentally stumble across a dirty word ;)  I added some cherry blossom to them and plan to put them on a shelf in my dining room.  I really love the way they turned out.  I can't wait to get them up on the wall!


And yes, I'm missing one cherry blossom.  For some dumb reason when I went to Hobby Lobby and got them I only got four instead of five.  Waiting for them to go back to 50% off again to buy another.  Total project cost (since I had the wine bottles leftover and the paint on hand) about $5.00!

This was the old mirror to my dresser we got at a thrift store.  We don't use the mirror and it's been sitting under our bed for two years.  I pulled it out, cleaned it off and painted it black.  It's not the best mirror out there but it was FREE (oh and it had to be THIS weekend when I ran out of Windex...).  I found the candle holders at a local thrift store this past weekend, brought them home, painted them with a little ORB (Oil Rubbed Bronze by Krylon), and voila.  The whole project cost me about $12.00!  Now I have one wall in my living room done at least.


Anyhow, I have MANY more projects in the mix, just trying to find time to do them all!  Will post them as I get finished! I'm not quite as innovative as my guru (Thrifty Decor Chick), but I'm trying to get there.

Thursday, February 4, 2010

New Blog I Love

I have fallen in love with this new blog "Make it and Love it".  Seriously some of the cutest ideas that I've ever seen.  This month she is having a giveaway of these super cute watches.

You seriously have to take a look at these, totally adorable (and check out this site, I just LOVE it)!  Check them out here, and get in on the giveaway!

Monday, January 25, 2010

Copycat Decorating 101

Ok, so I don't claim to be an expert in the least bit on decorating, however I am pretty good at doing cute stuff on a tight budget.

I do admit, I snag ideas here and there, however I'm not using these for resale or for profit in any way, so ethically it's fine.  I just find something I like and copycat it.

My daughter wanted a music theme room.  I found some ideas for wall decor and did my own copycats of them.

First I did a wall mural.  I found the photo on Google that I liked and replicated it on her wall.

Here is the original image:


Here is my copycat of it.


Not too shabby, and it only cost me the paint  (which I all ready had on hand), and about an hour of my time.  I LOVE doing this kind of stuff.  It's fun for me.  So yesterday I was sick and stuck at home.  So I decided to take a stab at another idea I saw I liked.

Here is the original image:


And here is my copycat version of it;


Just had hubby find some extra plywood he had in the garage and he cut me 8x8 sections and sanded it down.  I painted the sides black, then the tops of two white and the other tops of two black, then after it dried I reversed the colors and used while paint was still drying I scratched it to reveal the opposite color underneath.  Voila!  And it didn't cost me anything because I had it lying around, and it was TOTALLY fun to do.

I'm working on one last piece for her room, but this one is an original, and I'm not quite done with it yet, but I'll give you a sample....


Friday, December 18, 2009

Logo Work

Ok, so I've been staying up until midnight or later this week, but I've been doing some logo work.  It's been WAY too long since I've done anything remotely creative, so the lack of sleep is worth the payoff in the long run.  Well, at least I'm HOPING it will pay off and I will get some business coming in!

I'm pretty hapy with what I've come up with this week.  I feel like I've been pretty productive (graphic wise, however the laundry is still a hopeless cause...)

I did a logo for my hubby's work.


Then I did my business cards...


Then I did a few logos for my friend who currently is making adorable bags, and is also a great photographer.  You should really check out her bags and photographs.


So, all in all not too bad of a week.  I'm back in business again!  Hopefully offers will start pouring in ;)
Related Posts Plugin for WordPress, Blogger...